Introduction
In today’s digital era, communication has transcended geographical barriers, thanks to the advent of chat applications. These applications facilitate real-time interaction, making them indispensable for personal communication, business collaboration, and customer service. Implementing a chat application involves understanding the requirements, choosing the right technology stack, and ensuring seamless user experience and security. This guide provides a detailed, step-by-step approach to building a robust chat application.
Web Scraping with Scrapy: An In-Depth Guide
Understanding the Basics of Chat Applications
What is a Chat Application?
A chat application is a software platform that enables real-time text messaging between users. Modern chat applications often support multimedia sharing, group conversations, and other interactive features. Key components of a chat application include:
- Real-Time Messaging: Instant exchange of messages between users.
- User Authentication: Secure login mechanisms to verify user identities.
- Message Storage: Storing messages for future retrieval.
- Notifications: Alerts for new messages and other updates.
- Multimedia Support: Ability to send and receive images, videos, and files.
- Search Functionality: Allowing users to search through past conversations.
Importance of Chat Applications
Chat applications are crucial for various reasons:
- Enhanced Communication: They enable instant communication, which is faster than emails or phone calls.
- Collaboration: Facilitate teamwork through group chats and shared media.
- Customer Support: Businesses use chat apps for real-time customer service, improving user satisfaction.
- Community Building: Create platforms for people with similar interests to interact and share ideas.
Planning Your Chat Application
Defining the Scope
Before starting development, it’s essential to outline the features and functionalities of your chat application. Basic features include:
- User Registration and Login: Secure authentication system.
- One-on-One Chat: Private messaging between users.
- Group Chat: Messaging within a group.
- Media Sharing: Sending and receiving images, videos, and files.
- Online/Offline Status: Indicating whether users are online or offline.
- Push Notifications: Real-time alerts for new messages.
Choosing the Technology Stack
Selecting the right technology stack is crucial for the performance and scalability of your chat application. Here’s a recommended stack for a web-based chat application:
- Frontend: HTML, CSS, JavaScript (React, Angular, or Vue.js)
- Backend: Node.js with Express.js
- Database: MongoDB or PostgreSQL
- Real-Time Communication: Socket.IO or WebSockets
- Authentication: JSON Web Tokens (JWT) or OAuth
Designing the Architecture
A well-designed architecture ensures that the application is scalable, maintainable, and efficient. A typical chat application architecture includes:
- Client-Side Application: Manages the user interface and interactions.
- Server-Side Application: Handles business logic and data processing.
- Database: Stores user data and chat history.
- Real-Time Engine: Manages real-time message delivery.
Setting Up the Development Environment
Backend Setup
- Initialize a Node.js Project: Create a directory for your project and initialize it with npm:
   mkdir chat-app
   cd chat-app
npm init -y- Install Dependencies: Install necessary packages including Express, Mongoose, Socket.IO, JWT, and bcrypt:
npm install express mongoose socket.io jsonwebtoken bcrypt- Setup Express Server: Create a file named
server.jsand set up a basic Express server:
   const express = require('express');
   const http = require('http');
   const socketIo = require('socket.io');
   const mongoose = require('mongoose');
   const app = express();
   const server = http.createServer(app);
   const io = socketIo(server);

   // Connect to MongoDB
   mongoose.connect('mongodb://localhost:27017/chatapp', { useNewUrlParser: true, useUnifiedTopology: true });

   // Middleware
   app.use(express.json());

   // Start the server
   server.listen(3000, () => {
     console.log('Server is running on port 3000');
   });

   // Handle socket connections
   io.on('connection', (socket) => {
     console.log('New user connected');

     socket.on('disconnect', () => {
       console.log('User disconnected');
     });
   });
Database Schema
Define schemas for users and messages to structure your data.
User Schema
Create a models directory and add User.js:
const mongoose = require('mongoose');
const bcrypt = require('bcrypt');

const UserSchema = new mongoose.Schema({
  username: { type: String, required: true, unique: true },
  password: { type: String, required: true }
});

// Hash the password before saving
UserSchema.pre('save', async function(next) {
  if (!this.isModified('password')) return next();
  this.password = await bcrypt.hash(this.password, 10);
  next();
});

module.exports = mongoose.model('User', UserSchema);
Message Schema
Create Message.js in the models directory:
const mongoose = require('mongoose');

const MessageSchema = new mongoose.Schema({
  sender: { type: mongoose.Schema.Types.ObjectId, ref: 'User', required: true },
  content: { type: String, required: true },
  timestamp: { type: Date, default: Date.now }
});

module.exports = mongoose.model('Message', MessageSchema);
Authentication
Implement user registration and login using JWT.
User Registration and Login
Add routes in server.js for user registration and login:
const User = require('./models/User');
const jwt = require('jsonwebtoken');
const bcrypt = require('bcrypt');

// Register a new user
app.post('/register', async (req, res) => {
  const { username, password } = req.body;
  try {
    const user = new User({ username, password });
    await user.save();
    res.status(201).send('User registered');
  } catch (error) {
    res.status(400).send(error.message);
  }
});

// Login an existing user
app.post('/login', async (req, res) => {
  const { username, password } = req.body;
  try {
    const user = await User.findOne({ username });
    if (!user) return res.status(400).send('Invalid credentials');

    const isMatch = await bcrypt.compare(password, user.password);
    if (!isMatch) return res.status(400).send('Invalid credentials');

    const token = jwt.sign({ userId: user._id }, 'secretkey', { expiresIn: '1h' });
    res.send({ token });
  } catch (error) {
    res.status(400).send(error.message);
  }
});
Authentication Middleware
Create middleware to protect routes:
const jwt = require('jsonwebtoken');

const auth = (req, res, next) => {
  const token = req.header('Authorization').replace('Bearer ', '');
  if (!token) return res.status(401).send('Access denied');

  try {
    const decoded = jwt.verify(token, 'secretkey');
    req.user = decoded;
    next();
  } catch (ex) {
    res.status(400).send('Invalid token');
  }
};

module.exports = auth;
Real-Time Messaging
Set up real-time messaging using Socket.IO.
Socket.IO Events
Modify server.js to handle real-time message events:
const Message = require('./models/Message');

io.on('connection', (socket) => {
  console.log('New user connected');

  socket.on('sendMessage', async (data) => {
    const message = new Message({
      sender: data.userId,
      content: data.message
    });
    await message.save();

    io.emit('receiveMessage', message);
  });

  socket.on('disconnect', () => {
    console.log('User disconnected');
  });
});
Client-Side Implementation
Create a basic HTML and JavaScript frontend to connect to the server and handle real-time events.
HTML Structure
Create an index.html file:
<!DOCTYPE html>
<html>
<head>
  <title>Chat App</title>
  <script src="/socket.io/socket.io.js"></script>
</head>
<body>
  <div id="chat">
    <input id="messageInput" placeholder="Type a message..." />
    <button onclick="sendMessage()">Send</button>
    <div id="messages"></div>
  </div>

  <script>
    const socket = io();

    socket.on('receiveMessage', (message) => {
      const messagesDiv = document.getElementById('messages');
      const messageElement = document.createElement('div');
      messageElement.innerText = message.content;
      messagesDiv.appendChild(messageElement);
    });

    function sendMessage() {
      const messageInput = document.getElementById('messageInput');
      socket.emit('sendMessage', { userId: '12345', message: messageInput.value });
      messageInput.value = '';
    }
  </script>
</body>
</html>
Enhancing the Chat Application
With the basic functionality in place, you can enhance your chat application with additional features to improve user experience.
User Presence
Track and display user online/offline status.
let onlineUsers = {};
io.on('connection', (socket) => {
socket.on('userConnected', (userId) => {
onlineUsers[userId] = socket.id;
io.emit('updateUserStatus', { userId, status: 'online' });
});
socket.on('disconnect', () => {
const
userId = Object.keys(onlineUsers).find(key => onlineUsers[key] === socket.id);
delete onlineUsers[userId];
io.emit('updateUserStatus', { userId, status: 'offline' });
});
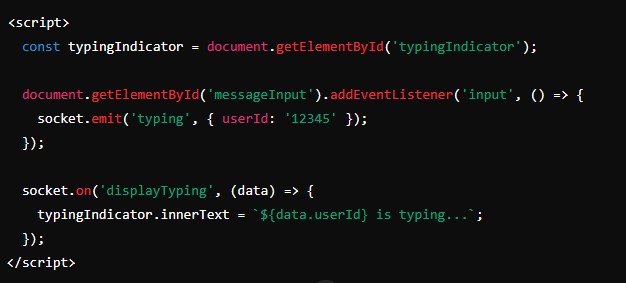
});Typing Indicators
Show when a user is typing.
socket.on('typing', (data) => {
  socket.broadcast.emit('displayTyping', data);
});
Update the client-side script to handle typing events.
<script>
  const typingIndicator = document.getElementById('typingIndicator');

  document.getElementById('messageInput').addEventListener('input', () => {
    socket.emit('typing', { userId: '12345' });
  });

  socket.on('displayTyping', (data) => {
    typingIndicator.innerText = `${data.userId} is typing...`;
  });
</script>
Media Sharing
Allow users to share images and files.
Server-Side Implementation
Install multer for handling file uploads.
npm install multerUpdate the server to handle file uploads.
const multer = require('multer');
const upload = multer({ dest: 'uploads/' });

app.post('/upload', upload.single('file'), (req, res) => {
  res.send({ filePath: req.file.path });
});
Client-Side Implementation
Add a file input to the HTML and handle file uploads in the JavaScript.
<input type="file" id="fileInput" />
<button onclick="uploadFile()">Upload</button>

<script>
  function uploadFile() {
    const fileInput = document.getElementById('fileInput');
    const formData = new FormData();
    formData.append('file', fileInput.files[0]);

    fetch('/upload', {
      method: 'POST',
      body: formData
    })
    .then(response => response.json())
    .then(data => {
      socket.emit('sendMessage', { userId: '12345', message: `File uploaded: ${data.filePath}` });
    });
  }
</script>
Testing and Deployment
Testing
Thoroughly test your chat application to ensure all features work as expected. Test for:
- Usability: Ensure the user interface is intuitive.
- Performance: Check the app’s response time and scalability.
- Security: Verify authentication and data protection mechanisms.
- Cross-Browser Compatibility: Ensure the app works on different browsers and devices.
Deployment
Deploy your chat application to a hosting service like Heroku, AWS, or DigitalOcean. Ensure you configure environment variables and set up the necessary databases and services.
- Prepare for Deployment:
- Set up a
.envfile for environment variables. - Configure database connections for production.
- Deploy to a Hosting Service:
- Create a new project on your chosen hosting platform.
- Push your code to the hosting service’s repository.
- Configure your application settings on the hosting platform.
Conclusion
Building a chat application involves understanding the requirements, choosing the right technology stack, and implementing key features such as real-time messaging, user authentication, and media sharing. By following this comprehensive guide, you can create a robust and scalable chat application that provides a seamless user experience. Remember to continuously test and enhance your application to meet user needs and ensure security.