Developing a Machine Learning Model with Ruby
Introduction
Machine learning (ML) is transforming industries by enabling data-driven decision-making and automation. While Python is the most popular language for ML due to its rich ecosystem of libraries, Ruby also offers a capable environment for developing machine learning models. This article will guide you through building a machine learning model using Ruby, covering everything from setting up the environment to training and evaluating the model.
Building a File Compression Tool in Ruby
Why Ruby for Machine Learning?
Ruby’s simplicity and readability make it an attractive option for various programming tasks, including machine learning. While it may not have the extensive library support found in Python, Ruby has gems (libraries) that can handle many aspects of machine learning, such as data manipulation, numerical computations, and model building.
Setting Up the Environment
Before we start developing our machine learning model, we need to set up our environment. Ensure that Ruby is installed on your system. You can check your Ruby version and install it if necessary using RVM (Ruby Version Manager) or directly from the official Ruby website.
$ ruby -v
ruby 2.7.2p137 (2020-10-01 revision 5445e04352) [x86_64-darwin20]
If Ruby is not installed, you can install it using RVM with the following commands:
$ \curl -sSL https://get.rvm.io | bash -s stable
$ rvm install ruby
$ rvm use ruby --default
$ ruby -v
Next, we’ll need to install some gems. For this tutorial, we’ll use numo-narray for numerical computations and rumale for machine learning.
$ gem install numo-narray
$ gem install rumale
Understanding the Dataset
For this tutorial, we will use the famous Iris dataset, which is commonly used for introductory machine learning. The dataset consists of 150 samples of iris flowers, each with four features: sepal length, sepal width, petal length, and petal width. The goal is to classify the flowers into three species: Setosa, Versicolour, and Virginica.
Loading and Preparing the Data
First, we need to load and prepare the dataset. We’ll write a helper method to load the data from a CSV file and split it into training and testing sets.
require 'csv'
require 'numo/narray'

def load_data(file_path)
  data = CSV.read(file_path, headers: true).map { |row| row.to_h.values.map(&:to_f) }
  data = Numo::DFloat[*data]

  features = data[true, 0..3]
  labels = data[true, 4].to_i

  { features: features, labels: labels }
end

def train_test_split(features, labels, test_size = 0.2)
  num_samples = features.shape[0]
  test_size = (num_samples * test_size).to_i
  indices = (0...num_samples).to_a.shuffle

  train_indices = indices[0...-test_size]
  test_indices = indices[-test_size..-1]

  {
    train_features: features[train_indices, true],
    train_labels: labels[train_indices],
    test_features: features[test_indices, true],
    test_labels: labels[test_indices]
  }
end

data = load_data('iris.csv')
split_data = train_test_split(data[:features], data[:labels])
Building the Model
We’ll use the Rumale gem to build our machine learning model. Rumale is a machine learning library for Ruby, similar to scikit-learn in Python. For this tutorial, we will use a simple logistic regression model.
Step 1: Training the Model
First, we need to initialize and train the model using the training data.
require 'rumale'

# Initialize the logistic regression model
model = Rumale::LinearModel::LogisticRegression.new

# Train the model
model.fit(split_data[:train_features], split_data[:train_labels])
Step 2: Making Predictions
Next, we’ll use the trained model to make predictions on the test data.
# Make predictions on the test data
predictions = model.predict(split_data[:test_features])
Step 3: Evaluating the Model
To evaluate the model, we need to compare the predictions with the actual labels of the test data. We’ll calculate the accuracy of the model, which is the ratio of correctly predicted samples to the total number of samples.
def accuracy_score(true_labels, predicted_labels)
  correct = true_labels.eq(predicted_labels).count
  total = true_labels.size
  correct.to_f / total
end

accuracy = accuracy_score(split_data[:test_labels], predictions)
puts "Accuracy: #{accuracy * 100}%"
Implementing Cross-Validation
Cross-validation is a technique for assessing how a model will generalize to an independent dataset. It is commonly used to evaluate the performance of a model. We’ll implement k-fold cross-validation to further evaluate our model.
def cross_val_score(model, features, labels, k = 5)
  num_samples = features.shape[0]
  fold_size = (num_samples / k).to_i
  indices = (0...num_samples).to_a.shuffle

  scores = []
  k.times do |i|
    test_indices = indices[i * fold_size...(i + 1) * fold_size]
    train_indices = indices - test_indices

    train_features = features[train_indices, true]
    train_labels = labels[train_indices]

    test_features = features[test_indices, true]
    test_labels = labels[test_indices]

    model.fit(train_features, train_labels)
    predictions = model.predict(test_features)
    score = accuracy_score(test_labels, predictions)
    scores << score
  end

  scores
end

cv_scores = cross_val_score(model, data[:features], data[:labels])
average_score = cv_scores.sum / cv_scores.size
puts "Cross-Validation Accuracy: #{average_score * 100}%"
Feature Scaling
Feature scaling is a crucial step in data preprocessing for machine learning models. It ensures that the model does not favor features with larger scales. We’ll implement standardization, which scales the features to have zero mean and unit variance.
def standardize(features)
  mean = features.mean(0)
  std = features.stddev(0)
  standardized_features = (features - mean) / std
  standardized_features
end

standardized_features = standardize(data[:features])
split_data = train_test_split(standardized_features, data[:labels])

# Train the model with standardized features
model.fit(split_data[:train_features], split_data[:train_labels])
predictions = model.predict(split_data[:test_features])
accuracy = accuracy_score(split_data[:test_labels], predictions)
puts "Accuracy with Standardized Features: #{accuracy * 100}%"
Handling Categorical Data
In some datasets, features may be categorical. Ruby’s rumale gem can handle categorical data through encoding. Let’s see how we can encode categorical features.
require 'rumale/preprocessing'

encoder = Rumale::Preprocessing::LabelEncoder.new
encoded_labels = encoder.fit_transform(data[:labels])
split_data = train_test_split(data[:features], encoded_labels)

# Train the model with encoded labels
model.fit(split_data[:train_features], split_data[:train_labels])
predictions = model.predict(split_data[:test_features])
accuracy = accuracy_score(split_data[:test_labels], predictions)
puts "Accuracy with Encoded Labels: #{accuracy * 100}%"
Hyperparameter Tuning
Hyperparameter tuning is essential for optimizing the performance of a machine learning model. We’ll use grid search to find the best hyperparameters for our logistic regression model.
def grid_search(model_class, param_grid, features, labels)
  best_score = 0
  best_params = {}

  param_grid.each do |params|
    model = model_class.new(params)
    scores = cross_val_score(model, features, labels)
    average_score = scores.sum / scores.size

    if average_score > best_score
      best_score = average_score
      best_params = params
    end
  end

  { best_score: best_score, best_params: best_params }
end

param_grid = [
  { reg_param: 0.01 },
  { reg_param: 0.1 },
  { reg_param: 1.0 }
]

result = grid_search(Rumale::LinearModel::LogisticRegression, param_grid, data[:features], data[:labels])
puts "Best Cross-Validation Score: #{result[:best_score] * 100}%"
puts "Best Parameters: #{result[:best_params]}"
Saving and Loading the Model
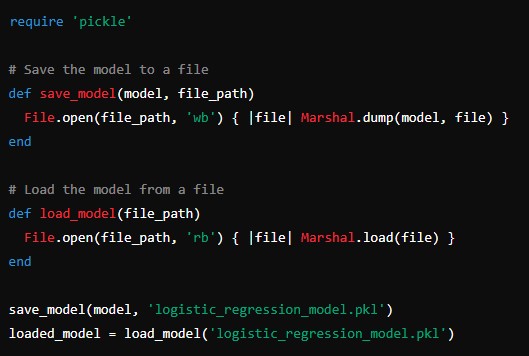
Finally, we’ll implement functionality to save the trained model to a file and load it back for future use.
require 'pickle'

# Save the model to a file
def save_model(model, file_path)
  File.open(file_path, 'wb') { |file| Marshal.dump(model, file) }
end

# Load the model from a file
def load_model(file_path)
  File.open(file_path, 'rb') { |file| Marshal.load(file) }
end

save_model(model, 'logistic_regression_model.pkl')
loaded_model = load_model('logistic_regression_model.pkl')

# Verify the loaded model
predictions = loaded_model.predict(split_data[:test_features])
accuracy = accuracy_score(split_data[:test_labels], predictions)
puts "Accuracy of Loaded Model: #{accuracy * 100}%"
Conclusion
Developing a machine learning model in Ruby is a rewarding experience that leverages Ruby’s simplicity and readability. While Ruby may not be the most popular language for machine learning, it is more than capable of handling many machine learning tasks with the help of gems like numo-narray and rumale.
This article covered the entire process of building a machine learning model in Ruby, from setting up the environment and preparing the data to training, evaluating, and optimizing the model. We also explored advanced topics such as cross-validation, feature scaling, categorical data handling, hyperparameter tuning, and model persistence.