Creating a Basic React App in JavaScript
React has become one of the most popular JavaScript libraries for building user interfaces. It is known for its efficiency, flexibility, and declarative style, which simplifies the process of building complex user interfaces. In this article, we will guide you through the steps to create a basic React application from scratch using JavaScript. Whether you are a beginner or looking to refresh your knowledge, this step-by-step guide will help you get started with React.
Building a Basic E-commerce Website in JavaScript
1. Introduction to React
React is a JavaScript library developed by Facebook for building user interfaces. It allows developers to create reusable UI components, making the development process more efficient and organized. React uses a virtual DOM to optimize rendering and improve performance, making it an excellent choice for building dynamic and responsive web applications.
2. Setting Up the Development Environment
Before we start building our React app, we need to set up our development environment. Here are the tools and software you need to get started:
- Node.js: A JavaScript runtime that allows you to run JavaScript on the server side. It includes npm, which is the package manager for JavaScript.
- Code Editor: An editor like Visual Studio Code (VS Code) is highly recommended for writing and managing your code.
Installing Node.js
To install Node.js, follow these steps:
- Visit the Node.js website.
- Download the LTS version for your operating system.
- Run the installer and follow the on-screen instructions.
After installation, verify the installation by running the following commands in your terminal:
node -v
npm -v
These commands should display the version numbers of Node.js and npm.
Installing Visual Studio Code
Download and install Visual Studio Code from the official website. VS Code provides a robust environment for JavaScript development with various extensions to enhance your productivity.
3. Creating the React App
React provides a command-line tool called Create React App that sets up a new React project with a sensible default configuration. It simplifies the setup process and allows you to focus on writing code rather than configuring build tools.
To create a new React app, follow these steps:
- Open your terminal.
- Run the following command to install Create React App globally:
npm install -g create-react-app- Once the installation is complete, create a new React project by running:
npx create-react-app my-react-appReplace my-react-app with your desired project name.
- Navigate to your project directory:
cd my-react-app- Start the development server:
npm startYour React app will open in your default web browser at http://localhost:3000.
4. Understanding the Project Structure
When you create a new React app using Create React App, it generates a project structure with several folders and files. Here is an overview of the key files and folders:
- public/: Contains the public assets of your application, such as the
index.htmlfile. - src/: Contains the source code of your React application.
- index.js: The entry point of your application.
- App.js: The main component of your application.
- App.css: The CSS file for styling your main component.
- package.json: Contains the dependencies and scripts for your project.
5. Creating Your First Component
In React, components are the building blocks of your application. A component is a reusable piece of UI that can accept inputs (props) and maintain its state.
Let’s create a simple component called HelloWorld:
- Inside the
srcfolder, create a new file namedHelloWorld.js. - Add the following code to
HelloWorld.js:
import React from 'react';

function HelloWorld() {
  return (
    <div>
      <h1>Hello, World!</h1>
    </div>
  );
}

export default HelloWorld;- Now, let’s import and use this component in
App.js:
import React from 'react';
import HelloWorld from './HelloWorld';

function App() {
  return (
    <div className="App">
      <HelloWorld />
    </div>
  );
}

export default App;- Save the files and check your browser. You should see “Hello, World!” displayed on the screen.
6. Working with JSX
JSX is a syntax extension for JavaScript that allows you to write HTML-like code inside your JavaScript files. It makes it easier to create and visualize the structure of your UI components. Under the hood, JSX is transformed into regular JavaScript function calls.
Here is an example of JSX:
const element = <h1>Hello, JSX!</h1>;The above JSX code is transformed into the following JavaScript code:
const element = React.createElement('h1', null, 'Hello, JSX!');7. State and Props in React
Props
Props (short for properties) are used to pass data from a parent component to a child component. They are read-only and cannot be modified by the child component. Let’s modify our HelloWorld component to accept a name prop:
import React from 'react';

function HelloWorld(props) {
  return (
    <div>
      <h1>Hello, {props.name}!</h1>
    </div>
  );
}

export default HelloWorld;
Now, we can pass the name prop from the App component:
import React from 'react';
import HelloWorld from './HelloWorld';

function App() {
  return (
    <div className="App">
      <HelloWorld name="React" />
    </div>
  );
}

export default App;
State
State is a way to manage data within a component that can change over time. Unlike props, state is mutable and can be updated by the component itself. To use state, we need to use the useState hook, which is provided by React.
Here is an example of using state in a component:
import React, { useState } from 'react';

function Counter() {
  const [count, setCount] = useState(0);

  return (
    <div>
      <p>Count: {count}</p>
      <button onClick={() => setCount(count + 1)}>Increment</button>
    </div>
  );
}

export default Counter;
In this example, we use the useState hook to create a count state variable and a setCount function to update it. When the button is clicked, the setCount function is called to increment the count.
8. Handling Events
React provides a way to handle events in a declarative manner. You can attach event handlers directly to your JSX elements using camelCase syntax. Here is an example of handling a button click event:
import React, { useState } from 'react';

function ClickMeButton() {
  const [message, setMessage] = useState('Click the button!');

  const handleClick = () => {
    setMessage('Button clicked!');
  };

  return (
    <div>
      <p>{message}</p>
      <button onClick={handleClick}>Click Me</button>
    </div>
  );
}

export default ClickMeButton;
In this example, the handleClick function is called when the button is clicked, updating the message state.
9. Adding Styles
There are several ways to add styles to your React components:
Inline Styles
You can use inline styles by passing a style object to the style attribute:
const divStyle = {
  color: 'blue',
  backgroundColor: 'lightgray',
  padding: '10px'
};

function StyledComponent() {
  return <div style={divStyle}>Styled Component</div>;
}
CSS Modules
CSS Modules allow you to scope your CSS locally to the component, avoiding global name conflicts. To use CSS Modules, follow these steps:
- Create a CSS file (e.g.,
StyledComponent.module.css):
.container {
  color: blue;
  background-color: lightgray;
  padding: 10px;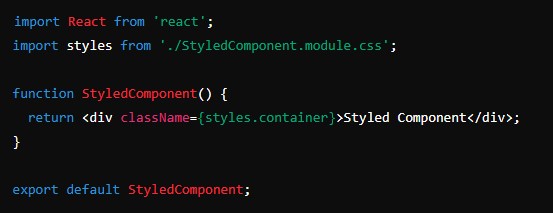
}- Import and use the styles in your component:
import React from 'react';
import styles from './StyledComponent.module.css';

function StyledComponent() {
  return <div className={styles.container}>Styled Component</div>;
}

export default StyledComponent;
Styled Components
Styled Components is a library that allows you to write CSS-in-JS. It helps in creating component-level styles. First, install the styled-components library:
npm install styled-componentsThen, you can create styled components like this:
import React from 'react';
import styled from 'styled-components';

const Container = styled.div`
  color: blue;
  background-color: lightgray;
  padding: 10px;
`;

function StyledComponent() {
  return <Container>Styled Component</Container>;


}

export default StyledComponent;
10. Building and Deploying the App
Once you have finished developing your React app, you need to build it for production. The build process optimizes your code and prepares it for deployment.
Building the App
To build your React app, run the following command:
npm run buildThis command creates a build folder containing the optimized production-ready files.
Deploying the App
There are several ways to deploy your React app. Here are a few options:
- GitHub Pages: You can host your React app on GitHub Pages for free.
- Netlify: A popular platform for deploying static websites with continuous integration.
- Vercel: Another popular platform for deploying static websites with easy integration.
Follow the documentation of the chosen platform to deploy your React app.
Conclusion
In this article, we have covered the basics of creating a React app using JavaScript. We started by setting up the development environment, creating a new React app, and understanding the project structure. Then, we created our first component, explored JSX, and learned about state and props. We also handled events, added styles, and built and deployed the app.