JavaScript libraries are an essential part of modern web development, providing reusable pieces of code that simplify and enhance the process of building web applications. Whether you’re looking to create a library for personal use, to share with others, or to contribute to the open-source community, understanding how to create a basic JavaScript library is a valuable skill. This guide will take you through the steps of creating a simple yet effective JavaScript library from scratch.
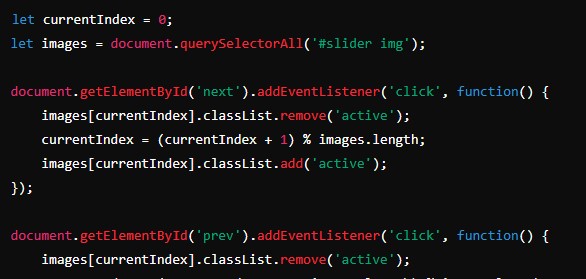
Creating a Simple Image Slider: A Step-by-Step Guide
Understanding the Basics of a JavaScript Library
A JavaScript library is a collection of pre-written JavaScript code that provides a set of functions and utilities to perform common tasks. Libraries are designed to simplify complex operations, making it easier for developers to implement functionality without writing repetitive code.
Benefits of Creating Your Own JavaScript Library
- Reusability: A library allows you to reuse code across multiple projects, reducing redundancy and improving efficiency.
- Modularity: Libraries promote a modular approach to coding, enabling better organization and maintainability.
- Customization: By creating your own library, you can tailor it to meet specific needs and requirements.
- Learning Experience: Developing a library enhances your understanding of JavaScript, design patterns, and best practices.
Planning Your JavaScript Library
Before writing any code, it’s important to plan your library. Consider the following:
- Purpose: Define the primary purpose of your library. What problem does it solve?
- Features: List the core features and functionalities you want to include.
- Naming: Choose a name for your library that is descriptive and unique.
- Scope: Determine the scope of your library. Start with a small, manageable set of features and expand over time.
Setting Up Your Project
Create a new directory for your library project and set up the necessary files and folders.
my-js-library/
├── src/
│   └── myLibrary.js
├── test/
│   └── myLibrary.test.js
├── .gitignore
├── package.json
└── README.mdsrc/: Contains the main library code.test/: Contains test files for your library..gitignore: Specifies files and directories to ignore in version control.package.json: Contains metadata about your project and its dependencies.README.md: Provides an overview and usage instructions for your library.
Initializing the Project
Initialize your project with npm (Node Package Manager). This creates a package.json file, which keeps track of your project’s dependencies and scripts.
npm init -yWriting the Core Library Code
Now, let’s write the core code for your library. In this example, we’ll create a library that provides basic utility functions for array manipulation.
Example: Array Utility Library
Create the myLibrary.js file in the src directory.
// src/myLibrary.js

(function(global) {
    // Create the library object
    const myLibrary = {};

    // Function to check if an array is empty
    myLibrary.isEmpty = function(arr) {
        return arr.length === 0;
    };

    // Function to find the maximum value in an array
    myLibrary.max = function(arr) {
        if (arr.length === 0) {
            throw new Error('Array is empty');
        }
        return Math.max(...arr);
    };

    // Function to find the minimum value in an array
    myLibrary.min = function(arr) {
        if (arr.length === 0) {
            throw new Error('Array is empty');
        }
        return Math.min(...arr);
    };

    // Function to calculate the sum of all elements in an array
    myLibrary.sum = function(arr) {
        return arr.reduce((total, num) => total + num, 0);
    };

    // Function to calculate the average of all elements in an array
    myLibrary.average = function(arr) {
        if (arr.length === 0) {
            throw new Error('Array is empty');
        }
        return myLibrary.sum(arr) / arr.length;
    };

    // Expose the library to the global object
    if (typeof module !== 'undefined' && module.exports) {
        module.exports = myLibrary;
    } else {
        global.myLibrary = myLibrary;
    }
})(this);
Explanation of the Code
- Immediately Invoked Function Expression (IIFE): The library is wrapped in an IIFE to avoid polluting the global namespace.
- Library Object: The
myLibraryobject holds all the functions. - Utility Functions: Functions like
isEmpty,max,min,sum, andaverageprovide array utility methods. - Global Exposure: The library is exposed to the global object, making it available for use in both browser and Node.js environments.
Testing Your Library
Testing is a crucial part of library development. It ensures that your functions work as expected and helps catch bugs early.
Setting Up a Test Framework
For testing, we’ll use Jest, a popular JavaScript testing framework. Install Jest as a development dependency.
npm install --save-dev jestUpdate your package.json to include a test script.
{
  "scripts": {
    "test": "jest"
  }
}
Writing Tests
Create a test file in the test directory.
// test/myLibrary.test.js

const myLibrary = require('../src/myLibrary');

test('isEmpty returns true for an empty array', () => {
    expect(myLibrary.isEmpty([])).toBe(true);
});

test('isEmpty returns false for a non-empty array', () => {
    expect(myLibrary.isEmpty([1, 2, 3])).toBe(false);
});

test('max returns the maximum value in an array', () => {
    expect(myLibrary.max([1, 2, 3])).toBe(3);
});

test('min returns the minimum value in an array', () => {
    expect(myLibrary.min([1, 2, 3])).toBe(1);
});

test('sum returns the sum of all elements in an array', () => {
    expect(myLibrary.sum([1, 2, 3])).toBe(6);
});

test('average returns the average of all elements in an array', () => {
    expect(myLibrary.average([1, 2, 3])).toBe(2);
});
Running Tests
Run the tests using the npm test script.
npm testJest will execute the tests and display the results in the terminal. Ensure all tests pass before proceeding.
Documenting Your Library
Documentation is vital for any library. It helps users understand how to use the library and what functionalities it offers.
Writing a README File
Create a README.md file in the root directory of your project.
# My JavaScript Library

A simple JavaScript library providing utility functions for array manipulation.

## Installation

To install the library, use npm:
bash
npm install my-js-library
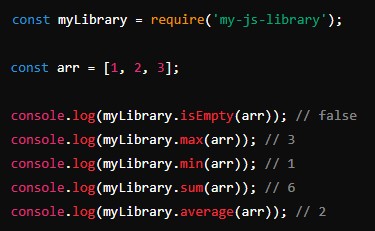
## Usage

Import the library and use its functions:
javascript
const myLibrary = require(‘my-js-library’);
const arr = [1, 2, 3];
console.log(myLibrary.isEmpty(arr)); // false
console.log(myLibrary.max(arr)); // 3
console.log(myLibrary.min(arr)); // 1
console.log(myLibrary.sum(arr)); // 6
console.log(myLibrary.average(arr)); // 2
## API

### isEmpty(arr)

Returns `true` if the array is empty, `false` otherwise.

### max(arr)

Returns the maximum value in the array. Throws an error if the array is empty.

### min(arr)

Returns the minimum value in the array. Throws an error if the array is empty.

### sum(arr)

Returns the sum of all elements in the array.

### average(arr)

Returns the average of all elements in the array. Throws an error if the array is empty.
Publishing Your Library
Once your library is ready and tested, you can publish it to npm, making it available for others to use.
Creating an npm Account
If you don’t already have an npm account, create one at npmjs.com.
Publishing the Library
Login to npm using the command line.
npm loginEnter your username, password, and email associated with your npm account.
Publish your library.
npm publishYour library is now live on npm, and users can install it using npm install.
Conclusion
Creating a basic JavaScript library is a rewarding experience that enhances your coding skills and contributes to the developer community. By following this guide, you’ve learned how to plan, develop, test, document, and publish a JavaScript library. Whether for personal projects or sharing with others, your library can now simplify and enhance the development process for various applications. Keep experimenting, adding new features, and improving your library as you continue your journey in web development. Happy coding!