Building a File Compression Tool in Ruby
Introduction
File compression is an essential tool in computing, enabling the reduction of file sizes for easier storage and faster transmission. Creating a file compression tool in Ruby provides a practical exercise in algorithm design and an opportunity to explore Ruby’s capabilities for handling file input/output and data processing. In this article, we will guide you through the process of building a simple yet effective file compression tool in Ruby.
Why Ruby?
Ruby is an expressive and versatile language, well-suited for this task due to its readability and powerful libraries. Its robust standard library includes support for file handling and manipulation, making it an excellent choice for building a file compression tool.
Overview of Compression Algorithms
File compression typically involves encoding information using fewer bits than the original representation. There are two main types of compression algorithms:
- Lossless Compression: This type of compression reduces file size without losing any information, allowing the original data to be perfectly reconstructed from the compressed data. Common lossless algorithms include Huffman coding, Run-Length Encoding (RLE), and Lempel-Ziv-Welch (LZW).
- Lossy Compression: This type of compression reduces file size by removing some information, typically in a way that minimizes the loss of quality. It is commonly used in image, audio, and video compression.
For this project, we will focus on implementing a lossless compression algorithm. Specifically, we will use Huffman coding, a widely-used method that achieves high compression ratios by assigning shorter codes to more frequent characters.
Setting Up the Environment
Ensure that Ruby is installed on your system. You can check your Ruby version and install it if necessary using RVM (Ruby Version Manager) or directly from the official Ruby website.
$ ruby -v
ruby 2.7.2p137 (2020-10-01 revision 5445e04352) [x86_64-darwin20]
If Ruby is not installed, you can install it using RVM with the following commands:
$ \curl -sSL https://get.rvm.io | bash -s stable
$ rvm install ruby
$ rvm use ruby --default
$ ruby -v
Creating the Project Structure
Let’s start by creating a directory for our project and setting up the basic structure:
$ mkdir file_compression_tool
$ cd file_compression_tool
$ mkdir lib
$ touch lib/huffman_coding.rb lib/compression_tool.rb main.rb
Implementing Huffman Coding
Huffman coding is a compression algorithm that assigns variable-length codes to characters based on their frequencies. Characters that occur more frequently are assigned shorter codes, while those that occur less frequently are assigned longer codes.
Step 1: Building the Frequency Table
We first need to read the input file and build a frequency table for the characters.
# lib/huffman_coding.rb
class HuffmanCoding
  attr_reader :frequency_table, :huffman_tree, :codes

  def initialize
    @frequency_table = Hash.new(0)
    @huffman_tree = nil
    @codes = {}
  end

  def build_frequency_table(file_path)
    File.foreach(file_path) do |line|
      line.each_char { |char| @frequency_table[char] += 1 }
    end
  end
end
Step 2: Building the Huffman Tree
Next, we’ll build the Huffman tree, which is a binary tree where each leaf node represents a character from the input file. The path from the root to a leaf node determines the code for that character.
# lib/huffman_coding.rb
class HuffmanCoding
  # Existing code...

  Node = Struct.new(:char, :frequency, :left, :right)

  def build_huffman_tree
    priority_queue = @frequency_table.map { |char, freq| Node.new(char, freq) }
    priority_queue = priority_queue.sort_by(&:frequency)

    while priority_queue.size > 1
      left = priority_queue.shift
      right = priority_queue.shift
      combined_frequency = left.frequency + right.frequency
      new_node = Node.new(nil, combined_frequency, left, right)
      priority_queue << new_node
      priority_queue = priority_queue.sort_by(&:frequency)
    end

    @huffman_tree = priority_queue.first
  end
end
Step 3: Generating Huffman Codes
With the Huffman tree constructed, we can generate the codes for each character by traversing the tree.
# lib/huffman_coding.rb
class HuffmanCoding
  # Existing code...

  def generate_codes(node = @huffman_tree, code = "")
    if node.char
      @codes[node.char] = code
    else
      generate_codes(node.left, code + "0")
      generate_codes(node.right, code + "1")
    end
  end
end
Step 4: Encoding the File
We can now use the generated codes to encode the input file.
# lib/huffman_coding.rb
class HuffmanCoding
  # Existing code...

  def encode_file(input_file_path, output_file_path)
    build_frequency_table(input_file_path)
    build_huffman_tree
    generate_codes

    encoded_content = ""
    File.foreach(input_file_path) do |line|
      line.each_char { |char| encoded_content << @codes[char] }
    end

    File.open(output_file_path, "wb") do |file|
      file.write(encoded_content)
    end
  end
end
Decoding the File
To complete our tool, we need to implement the decoding functionality, which will reconstruct the original file from the compressed one.
# lib/huffman_coding.rb
class HuffmanCoding
# Existing code...
def decode_file(input_file_path, output_file_path)
encoded_content = File.read(input_file_path)
decoded_content = ""
current_node = @huffman_tree
encoded_content.each_char do |bit|
current_node = bit == "0" ? current_node.left : current_node.right
if current_node.char
decoded_content << current_node.char
current_node = @huffman_tree
end
end
File.open(output_file_path, "w") do |file|
file.write(decoded_content)
end
end
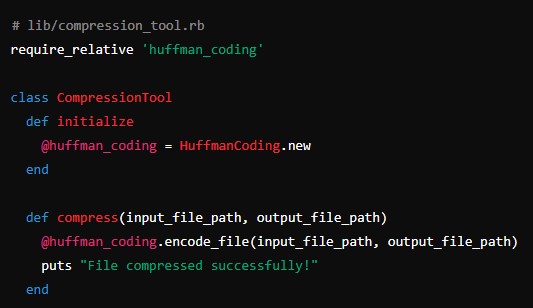
endCreating the Compression Tool
Now, let’s create the main compression tool class, which will provide a user-friendly interface for encoding and decoding files.
# lib/compression_tool.rb
require_relative 'huffman_coding'

class CompressionTool
  def initialize
    @huffman_coding = HuffmanCoding.new
  end

  def compress(input_file_path, output_file_path)
    @huffman_coding.encode_file(input_file_path, output_file_path)
    puts "File compressed successfully!"
  end

  def decompress(input_file_path, output_file_path)
    @huffman_coding.decode_file(input_file_path, output_file_path)
    puts "File decompressed successfully!"
  end
end
Running the Tool
We’ll use the main.rb file to interact with the user and perform compression or decompression based on their input.
# main.rb
require_relative 'lib/compression_tool'

def print_usage
  puts "Usage:"
  puts "  ruby main.rb compress <input_file> <output_file>"
  puts "  ruby main.rb decompress <input_file> <output_file>"
end

if ARGV.size != 3
  print_usage
  exit
end

command, input_file, output_file = ARGV

tool = CompressionTool.new

case command
when "compress"
  tool.compress(input_file, output_file)
when "decompress"
  tool.decompress(input_file, output_file)
else
  print_usage
end
Enhancements and Additional Features
Our basic file compression tool is now functional, but there are many enhancements and additional features we can add:
- Error Handling: Improve the robustness of the tool by adding error handling for common issues such as file not found, permission errors, and invalid input.
- Compression Ratio Calculation: Calculate and display the compression ratio to give users feedback on the effectiveness of the compression.
- Support for Multiple Files: Allow the tool to compress and decompress multiple files at once.
- User Interface: Develop a graphical user interface (GUI) using libraries like Ruby GTK or Ruby Shoes to make the tool more user-friendly.
- Different Compression Algorithms: Implement other compression algorithms like LZW and provide users with options to choose the algorithm they prefer.
Conclusion
Building a file compression tool in Ruby is an excellent way to practice algorithm design and file manipulation. By following this guide, you have created a functional tool that compresses and decompresses files using Huffman coding. This project provides a solid foundation for further enhancements and more advanced features, offering a valuable learning experience for developers at all levels. Whether you are a beginner looking to improve your programming skills or an experienced developer seeking a challenging project, building a file compression tool in Ruby is a rewarding endeavor.